How to - Jitter Java Objects

The options to write code for Max/MSP are as follows (efficiency tests results see forum post):
- c++
- c
- java ... 1.5 times slower than C
- javascript ... 200 times slower than Java
Step by Step
Disclaimer: This guide shows the steps i followed when creating my first java jitter externals for Max/MSP. It is far from a comprehensive guide, it might not work for everyone and especially not every operating system, but it worked for me. Note: This is a Windows-7 guide.

1. Java Virtual Machine
Java objects for Max function with the mxj external, which builds the connection between your Max patch and your java code being executed in the Java Virtual Machine (JVM). Be aware that there is a little bottleneck of 1 microsecond for every package that is passed between your [mxj] object and JVM.
- Find out what Java version is installed on your computer with the javatester.org, or Verifying Java Version
- In the likelihood of needing to install or update Java, go to java.com

2. Setup Eclipse
You need an development environment to write and compile your Java code. Eclipse is free, open source, popular and cross platform.
- Download Eclipse Classic 4.2.2 (JUNO) at eclipse.org/downloads. As alternative: Eclipse IDE for Java Developers should work too.
- Install Eclipse, and pick your workspace directory
- Setup your workbench: WINDOW > OPEN PERSPECTIVE > JAVA
3. Create Eclipse Java project
- Create a new project by: NEW > JAVA PROJECT, name the project, select the appropriate JRE (most likely JavaSE-1.7, but if you want to use your externals on older computers choose JavaSE-1.6) and click finish.

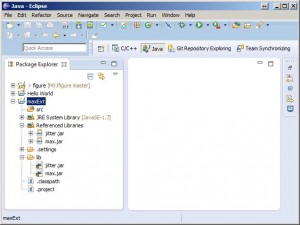
Once you added the jitter.jar and max.jar to your project's lib directory, and added both libraries to your build path, your package explorer should look like this.
4. Import Libraries
- Create a lib folder within your Java project.
- Copy max.jar and jitter.jar from the C:\Program Files (x86)\Cycling '74\java\lib\ directory into the new lib folder. Refresh (F5) inside Eclipse to see the libraries in the Package Explorer. (ALTERNATIVE: add libraries as external jars)
- Add both libraries to build path by right-click: BUILD PATH > ADD TO BUILD PATH. They will now be listed under Referenced Libraries.
5. Setup Github
I am squeezing the Eclipse+Git setup and github linkage in between here, as it changed my folder structure, which will effect the other upcoming steps. More setup help at the EGit User Guide.
- First, setup a new repository on github.com
- Verify your SSH settings in Eclipse by: WINDOW > PREFERENCES > GENERAL > NETWORK CONNECTIONS > SSH2. Verify your SSH2 home is C:\Users\eva\Documents\.ssh. For this to work i had to create an additional SSH key that is only for Eclipse (in addition to my computer's usual SSH key).
- Install EGit by: HELP > INSTALL NEW SOFTWARE and paste http://download.eclipse.org/releases/juno in 'Work with' line. (Pick URL adequate for your IDE here: eclipse.org/egit/download/)
- Type EGit into the filter, then pick and install Eclipse EGit and EGit Mylyn and Eclipse EGit Mylyn GitHub Feature
- EGit setup: identify yourself
- Set the environment variable HOME by: type environment in start menu, select Edit environment variables for your account, click 'new', enter HOME into name field, enter %USERPROFILE%\Documents\ into value field. Restart Eclipse
- Right click on project and: TEAM > SHARE PROJECT, select Git, click 'Create', Parent directory will be C:\Users\eva\Documents\git, name it, and click 'finish'.
- Add files to repository by: TEAM > ADD TO INDEX
- Commit with: TEAM > COMMIT
- Setup your Destination Git Repository with the github project's SSH URL, ssh as protocol, git as User and no password. Click 'next', if connection successful, accept the host key, enter your SSH key's passphrase and continue to push commits.
6. Write Code
Write a first dummy class for testing purposes. No jitter functionality for now.
- Create a new class with NEW > CLASS, give it a name and click finish.
import com.cycling74.max.*; public class dummyObject extends MaxObject { public void bang() { outlet(0, "BANG"); } } - As soon as you save the file, Eclipse will autocompile it for you. Check your project directory, you should find a dummyObject.class inside the /bin directory. (The .java files inside the /src directory are the source files, while the .class files are compiled code)

Write a simply Hello World program
7. Test Java External
First you need to tell Max/MSP where it can find your Java externals.
- Locate your max.java.config.txt file (should be in C:\Program Files (x86)\Cycling '74\Max 5.0\Cycling '74\java folder) and add a new line, defining the location of the .class files inside the /bin directory:
max.dynamic.class.dir C:/Users/eva/Documents/git/maxExt/maxExt/bin
- Start Max and create a new patch
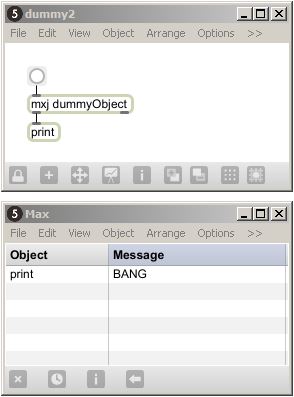
- Add your object [mxj dummyObject] and see if it works.
- Go back and change your code in Eclipse. Make sure to save, so it autocompiles the new class file. Delete your object in your Max patch, and immediately undo the action. Now the class file has been updated in Max's memory as well.

Jitter example
8. Write and test a Jitter example
Now let's test if our java class can also create jitter objects, and draw simple geometry with the [jit.gl.sketch] object.
- Write a new class:
import com.cycling74.max.*; import com.cycling74.jitter.*; public class dummyJitter extends MaxObject { // jitter objects JitterObject sketch; JitterObject texture; float v = 0.0f; /* instantiate mxj with render context as argument */ public dummyJitter(String context) { declareIO(2, 1); // declare 2 inlets, 1 outlet // instantiate Jitter sketch object sketch = new JitterObject("jit.gl.sketch"); sketch.setAttr("drawto", context); sketch.setAttr("glclearcolor", new Atom[] { Atom.newAtom(0.), Atom.newAtom(0.), Atom.newAtom(0.), Atom.newAtom(1.) }); } public void bang() { sketch.call("reset"); sketch.call("glcolor", new Atom[] { Atom.newAtom(1.), Atom.newAtom(0.5), Atom.newAtom(0.), Atom.newAtom(1.) }); v += 1.0f; // rotation value sketch.call("glrotate", new Atom[] { Atom.newAtom(v), Atom.newAtom(0), Atom.newAtom(0), Atom.newAtom(1) }); // draw a triangle sketch.call("glbegin", "polygon"); sketch.call("glvertex", new Atom[] { Atom.newAtom(0.5), Atom.newAtom(0.5), Atom.newAtom(0) }); sketch.call("glvertex", new Atom[] { Atom.newAtom(-0.5), Atom.newAtom(0.5), Atom.newAtom(0) }); sketch.call("glvertex", new Atom[] { Atom.newAtom(-0.5), Atom.newAtom(-0.5), Atom.newAtom(0) }); sketch.call("glend"); } } - By saving the class in Eclipse, the IDE will compile the class file for you
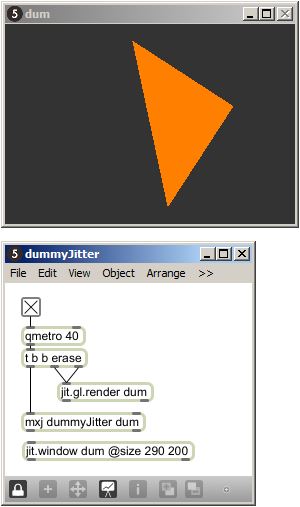
- Create a Max/MSP patch with a [jit.gl.render] object, a [jit.window] for showing the graphics, and your [mxj dummyJitter] object. Give them all the same render context, run a metro and see if you see the spinning triangle.
9. Max/MSP communication with Java object, and vice versa
Triggering functions within or sending values into the java object, is straightforward. All you need to do is send in messages in the left inlet. If you want to have the java object communicate back to the patch, you can use the outlet() function.
An elegant way to update GUI elements with values from within the java object - without having to make connection lines - is by using script and the [thispatcher] object.
- Create a number box, and assign a scripting name to it.
- Connect a [fromsymbol] and a [thispatcher] object to the left outlet of the java object.
- To simply set the value of the number box, write
outlet(1,"script send gui_v set "+v);
- To send (not just set) a value to the number box, write
outlet(1,"script send gui_v "+v);
Helpful Links
WritingMaxExternalsInJava.pdf
very helpful guide, the PDF is to be found in the 'java-doc' folder in your Max folder
Max/MSP Development with Eclipse
How to setup Eclipse to develop Java externals
MaxMSPExternalsTutorials3.2.pdf"
by Ichiro Fujinaga, McGill University, Sept 2006
Tutorial for writing external objects with C
Tutorial 51: Jitter Java
Tutorial by Cycling74


