Hello First Processing Library
I managed to create a processing library! ZeoLibrary lets you import and analyse Zeo Sleep Manager data files with processing.
It is a very simple library (for now) but i am happy nonetheless because i managed to battle eclipse, ant compilers, javadocs and subversion. Everything went considerably smooth, so i thought i'd write down my own how-to guide, in case i (or you) ever want to do it again.

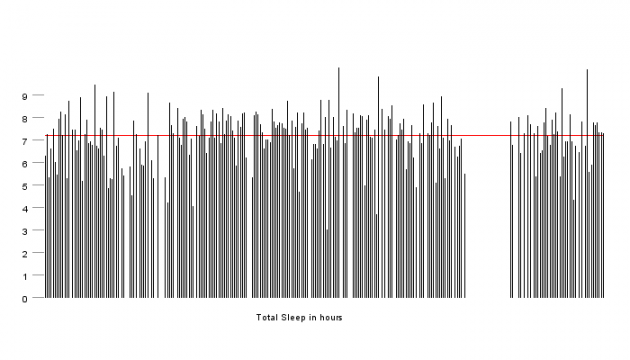
Graph drawn with the processing example zeoReader_drawz that is included in the library
Step by Step
Disclaimer: This guide shows the steps i followed when creating my first processing library. It is far from a comprehensive guide, it might not work for everyone and especially not every operating system, but it worked for me. Note: This is a Windows-7 guide.
1. Install Eclipse
First step of course, download and install eclipse.
- Download Eclipse IDE for Java Developers
The latest package can be found at eclipse.org/downloads. Currently the latest package is Juno (4.2) which i ran into trouble with. I reverted and actually downloaded Indigo (3.7) which you can find at eclipse.org/downloads/packages/release/indigo/sr2. - Install Eclipse, and pick your workspace directory
2. Get Eclipse working with Processing
This is just so you get familiar with working on processing within eclipse, and to make sure you have all the JDK references set right.
- Set a JAVA_HOME environment variable that points to the root of your JDK: CONTROL PANEL > SYSTEM > ADVANCED > ENVIRONMENT VARIABLES > SYSTEM VARIABLES. (mine is set to C:\Progra~1\Java\jdk1.6.0_02\jre)
- I also followed the advice from here to delete the CLASSPATH environment variable, but i am not sure if it was essential.
- Set Java Runtime Environment within eclipse: WINDOW > PREFERENCES > JAVA > INSTALLED JREs> ADD > STANDARD VM, select the JRE folder within your JDK directory, finish and make sure the new JRE is selected. (my JRE home is C:\Program Files\Java\jdk1.6.0_02\jre)
- Create a new project: FILE > NEW PROJECT > JAVA PROJECT
- Import Processing library: FILE > IMPORT > GENERAL > FILE SYSTEM. Browse to the 'lib' folder within your Processing directory. Select 'core.jar' and click Finish. (I used processing 1.5.1, as i had trouble with the 2.0 alpha release)
- Add core.jar to build path by right-click: BUILD PATH > ADD TO BUILD PATH
- Create a dummy code class by: FILE > NEW > CLASS and copying dummy code from processing.org/learning/eclipse
- Run your processing applet with: RUN > RUN AS > JAVA APPLET. Your applet should open and run in similar fashion as when using the Processing IDE.
3. Import and Testrun LibraryTemplate
Download and compile the processing library template (detailed instructions). The library template is was created by Andreas Schlegel.
- Download the latest library-template-0.X.X.zip from here (no need to unzip)
- Create a new project: FILE > NEW PROJECT > JAVA PROJECT
- Import the library-template zipfile: FILE > IMPORT > GENERAL > ARCHIVE
- Import Processing library core.jar: FILE > IMPORT > GENERAL > FILE SYSTEM
- Add core.jar to build path by right-click: BUILD PATH > ADD TO BUILD PATH
- Edit file resources/build.properties: Edit the processing sketchbook and library locations. Start with project.compile=fast and make sure that works before moving on to project.compile=normal.
sketchbook.location=${user.home}/My Documents/Processing classpath.local.location=${user.home}/My Documents/code/libs classpath.local.include=core.jar classpath.libraries.location=${sketchbook.location}/libraries java.target.version=1.6 - Compile, first open Ant window via WINDOW > SHOW VIEW > ANT, then drag resources/build.xml into it, select ProcessingLibs, press RUN.
- The result will hopefully be BUILD SUCCESSFUL
- Test the libary. The 'fast' build simply placed the library within your processing libraries folder. You should be able to add the library from within the Processing IDE now.
4. Write Code and Compile
Now it's time to actually write your library.
- Position your classes within in a file structure like src/zeo/library and reference your packages like this: package src.zeo.library;
- Dont' forget to update the build.properties file with all your library's meta data
- Compile by: resources/build.xml > right-click > RUN AS > ANT BUILD
- If you have not done already, try project.compile=normal to see if everything works (html-page, reference, distribution zip-file, ...)
5. Javadoc
If you are consistent with commenting your code, generating your documentation will be easy. Just follow a few simple rules, and all your commenting will live on in professional-looking reference pages.
- Proper commenting before classes, will become class descriptionin the documentation.
/** * ZeoNight class, * contains all sleep data information and * most of your Zeo sleep diary information * * @author evsc * */ public class ZeoNight { - Proper commenting before functions, will become function descriptionin the documentation. Eclipse is usually nice and preprints all possible tags for you (@param, @return).
/** * set main date of night * * @param input date in string form */ public void setDate(String input) { - Proper commenting before variables, will become variable descriptionin the documentation.
/**
* total sleep minutes
*/
public int total_z;
- I didn't get the javadoc part of the library-template to work, so i found another way. PROJECT > GENERATE JAVADOC (or: FILE > EXPORT > JAVA > JAVADOC) - Configure your javadoc.exe (mine is at C:\Program Files\Java\jdk1.6.0_02\bin\javadoc.exe), set your output destination and generate. (I notice sometimes i need to activate the process twice, if the documentation doesn't list all classes immediately)
6. Google Code SVN setup
In the spirit of Processing, why not share your code and invite others to contribute. Google-code and github are among the obvious options, and after spending some time with github and just a little bit of time with google-code, i must say i prefer google-code. And as google-code can do SVN and eclipse can do SVN, it is quite easy to link those two up:
- Start a project on google-code
- Install Subclipse: HELP > INSTALL NEW SOFTWARE > works with: http://subclipse.tigris.org/update_1.8.x (detailed instructions)
- Add google-code repository: WINDOW > SHOW VIEW > OTHER > SVN REPOSITORY, new repository URL: https://your_url.googlecode.com/svn/trunk
- Link project to repository: right-click > TEAM > SHARE PROJECT > select URL
- Authentication with your google email address and your googlecode.com password (link on your google-code source page)
- Make first commit with: right-click > TEAM > COMMIT. (You don't need to commit all your files)
- Browse your online source directory to verify that all code ended up online!
Helpful Links along the way
processing.org/learning/eclipse
how to get started with processing inside the eclipse IDE
LibraryTemplate
processing library template for eclipse, how to guide
Getting-Eclipse-in-Sync-with-Subversion-and-Google-Code
setting up SVN within eclipse, and get it to communicate with google code
generating-javadoc-in-eclipse-ide
how to generate nifty looking javadoc pages with eclipse
